

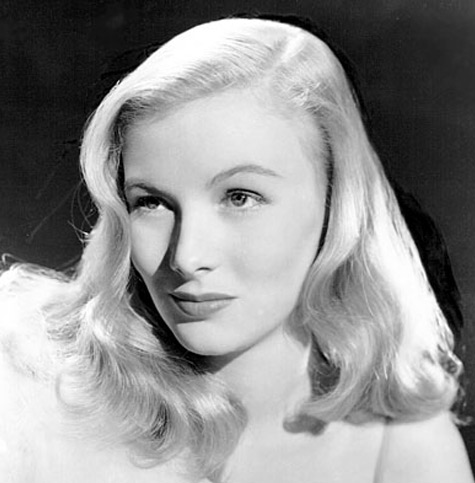
Colorizing a Grayscale image!
To make coloured photo black and white is easy. Try it the other way round.
Also take a look at other Photoshop tutorials...
Slim button | Sparkling stars effect | Weathered stamp/flyer | Making colorful web site template | Space flight simple |
Colorizing Grayscale Image
It might seem hard, but it isn’t. However, it is well time consuming.
However, I deem some parts of this tutorial to be more advanced,
it might require some previous knowledge of Layer Mask or Quick Mask (click to view tutorial about them)
However, I deem some parts of this tutorial to be more advanced,
it might require some previous knowledge of Layer Mask or Quick Mask (click to view tutorial about them)
1. Open Grayscale image
2. Layer/New Adjustment layer/Hue Saturation
3. Next to the layer, there is layer mask, which shows what part of the picture is affected by the layer or what part of the layer is visible. White means visible, black the opposite.
Click on the Layer mask and fill it with black, so that no effects will be shown. Use brush tool to paint white in the layer mask. After doing that, double click on the Adjustment layer to change the settings. If you are not happy with the layer mask, just click on it again and paint in it either black or white.

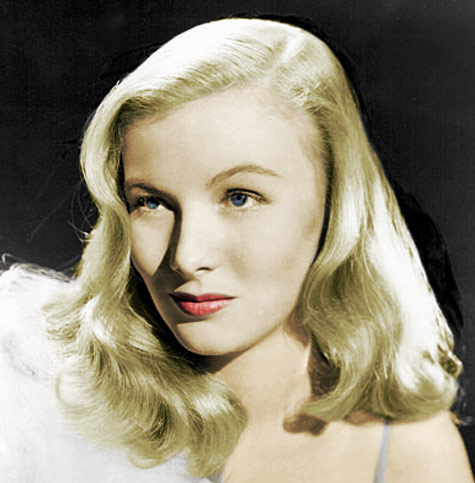
Do the same for lips (make another adjustment layer, paint its layer mask black and draw white in the position of lips). Repeat the same fo all parts of the picture, hair, eyes, clothes and skin (this is the worst part, cos it is tremendously difficult to find rather natural hue).
Try and have fun. If you can do this, you can be proud of yourself for this process needs both imagination of an artist and precision of an artist.
Have fun. I had mine :))
If you liked this tutorial (or even if you didnt :) please make a Comment and Vote in the section below.
Thank you.
Submitted by Martin on 2006-03-08 15:27:25. Since then read 48481 times.
Scored 4.23 points out of maximum 5 by 40 votes.
Also take a look at other Photoshop tutorials...
Burning text | Weathered stamp/flyer | Post-it-note | Crumbled old paper texture | All about Layer Mask |
Rate this tutorial!
Invite a friend!
Discussion
Beren said on 2006-04-09 13:28:08Respect man, that one is cool. Iam sure you have spent your youth in a photoshop studio :) respect.
Archangel whoknows AT yahoo DOT com said on 2006-05-02 03:20:18
Wow. That just Powns. wonderful work
Martin mato AT t-tutorials DOT com said on 2006-05-02 16:18:35
Thx men. I am glad you liked it. It isnt that hard to do but it is well timeconsuming. U know, skin color is never natural enough :D
Helmutt Helmutt AT englishcottagegarden DOT biz said on 2006-12-02 14:09:50
Yet another great result. This is a fantastic site with great hints. I think I could literally spend days reading the tutorials. In this example you layer the hair. How did you do that so well? Is there a tutorial dedicated to hair (layering, colouring etc.).
Martin mato AT t-tutorials DOT com said on 2006-12-05 14:16:16
thx Helmutt, I am glad you like this tutorial and the site. And to your question, the method I used is the one I explained here and that is the Layer Mask. Alternatively the Quick Mask could also be used. You can find tutorials on both of these tools in the Basics section. good luck
hmm said on 2007-10-03 21:02:49
i try to make one with brown hair into blond hair, but i cant get that realistic color that i want, how did u make that blond color that realistic??:/
alyssa soccerchck18 AT aol DOT com said on 2007-10-07 04:11:33
use this
Sandra said on 2008-03-15 04:55:10
That colorization is very poor. The skin tone is greyish, the eye color and hair color aren't realistic at all.