

Tolkiens Master Ring
You have surely seen Lord of the Rings, or read the book. This is how I made my own Master Ring.
Also take a look at other Photoshop tutorials...
Blue Matter | Making sepia hue | Red tissue | Light in the Tower | Slim button |
Pages
Tolkiens Master Ring
In this tutorial we will continue what was started in tutorial Mastering Layer Mask and add something more complex. Have you read Lord of the Rings? Or seen the films? I did both. Imagine the main object of the story - the one ring.
This will be the outcome:
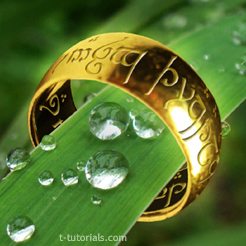
"One ring to rule them all,
one ring to find them,
one ring to bring them all
and in the darkness bind them."
Now you have your image of the ring, I am sure it of uncanny likeliness to the one seen in the film for when you see a film, it usually ruins your imagination and your own visual image.
One more thing, this tutorial is dedicated to ScreamJD who is an endless source of constructive criticism :) and whose word I always value the most :D
But lets get to work. You came all the way from the lonely mountain just to learn how to craft the one ring? If the answer is yes, I am sure that after this tutorial you will be more skilled in making rings in general (or at least in putting rings on various objects) and particularly in adding some glowing magical writing.
By the way, in due course, I plan to start teaching also chiseling the glowing writing of the Moria Gate.
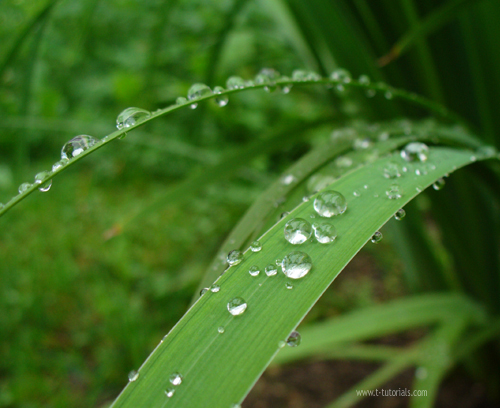
Anyway. Follow me into the forge and we shall start with the ring. In addition, we shall put the ring on a grass stem to let it cool down.
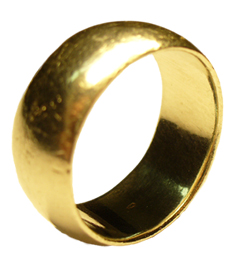
To get the ring, use Magic Wand tool to select white background, then press Select/Inverse selection and press Del. Copy the layer to the other picture.
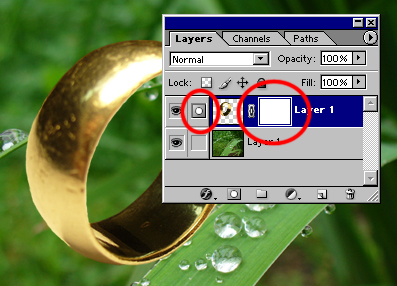
To show the PhotoShop, which part of the layer you want to hide, click on the icon I marked in the picture to make a Layer Mask of the layer.
In the following steps, we will use Layer Mask tool. If you are not sure what does Layer mask do and what is it function, and you want to understand it completely, read the All About Layer Mask tutorial.

Now you should have a white square to the left of the layer. Notice it is whole white - this represents that all parts of the layer are yet visible. Also notice that is it the same size as our image - meaning it covers whole size of the layer. I have also marked the other thing. To know that you are currently working in a Layer Mask and not in the layer itself, PhotoShop shows a little icon to the left of the layer.
Pages
Submitted by Martin on 2006-04-20 22:35:50. Since then read 29072 times.
Scored 4.61 points out of maximum 5 by 119 votes.
Also take a look at other Photoshop tutorials...
Retouch of panorama | Add lightning to your photo | Colorizing a Grayscale image! | Making abstract wallpaper | Burning text |
Rate this tutorial!
Invite a friend!
Discussion
Beren said on 2006-04-21 21:36:00Wow, that really is awesome. Lord of the Rings. Cool.
George jorge_2021ar AT yahoo DOT com said on 2006-05-04 08:27:48
Im having trouble here.. When i get to the part where it talks about the " select/feather. I cant use it. its grayed out. So how can i set it so i can use. help pls anyone. ty
Martin mato AT t-tutorials DOT com said on 2006-05-04 14:55:34
It might be grayed just because you dont have any selection active. Try to make a selection and just afterwards use Select/Feather. It should work. Anyway, I think that you know, but for others to know as well, Feather makes the borders of your selection less distinct, as if made with Soft Brush. So, e.g. if you filled feathered selection with a color, the underlying image would still be partly visible at the borders of that area . I hope that is clear. It should work. Another thing. The feather feature is not needed so much in this tutorial - you can easily do without it. It will look a bit better when used though :)
Milo info AT eburgman DOT nl said on 2006-05-04 21:28:56
Hey man, great tutorial about the ring, totally loved it..... I'm gonna it try it soon :D
Mr. B. C. Phukan bcphukan AT indiatimes DOT com said on 2006-05-05 13:53:41
Martin! Simply fantastic! More such masterpieces are welcome.
Mr. B. C. Phukan bcphukan AT indiatimes DOT com said on 2006-05-06 05:15:32
Martin ! Is it possible to use regular fonts instead of the fonts used on the ring?
Martin mato AT t-tutorials DOT com said on 2006-05-06 10:50:50
Well, you can use any font you like. You will just apply the same distourtion as I used and it should look fine. I didnt think about other fonts because I wanted to make the Mater ring right from the beginning. If you get a good looking outcome using other fonts, send tge picture to me and I might post it in the tutorial.
photonoobie said on 2006-05-07 10:14:50
woot! thats 1 of the best tuts eva
Count Azurit said on 2006-11-02 18:49:39
Ah, having a split personality again? Anyway, really nice. I just hope that I shall meet you in person somewhere in future. Search _ on the blue software homing pidgeon that allows your voice to carry over the hills and far away. There is still much to be said.
Count Azurit said on 2006-11-02 18:51:26
What you are supposed to search is /little blue rabbit/_/the company that made him/. I used php brackets before and our common friend have thought of that.
joy said on 2008-01-10 20:12:03
Nice tutorial! Thanks for posting!
Helen helen_elizabeth2002 AT yahoo DOT co DOT uk said on 2009-01-09 12:36:47
Really enjoyed this tutorial. Thanks
priyanka priyankagopinath AT yahoo DOT com said on 2010-10-21 22:04:50
loved the tutorial, still trying to put the text on the ring! thanks a lot..