

All About Adjustment Layers
Discover how and when you should use Adjustment Layers instead of normal effects.
Also take a look at other Photoshop tutorials...
Retouch of panorama | Making abstract wallpaper | Blue Matter | Comet or Shooting Star | Vacation and holiday accessories tips |
Pages
Part IV. - What lies under gets affected
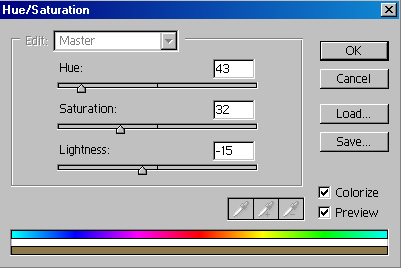
Lets say you want to change color of the picture, lets say to sepia color (if you wish to know the other way of doing it, check also Making Sepia Hue tutorial).
So, we will make a new Adjustment Layer with Hue Saturation.
When you see the window of normal Hue Saturation set the following settings.
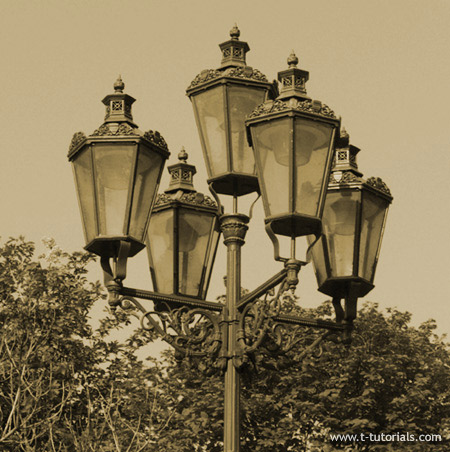
Till this point, everything would be the same if you used just traditional Image/Adjustments. But now there is a change.
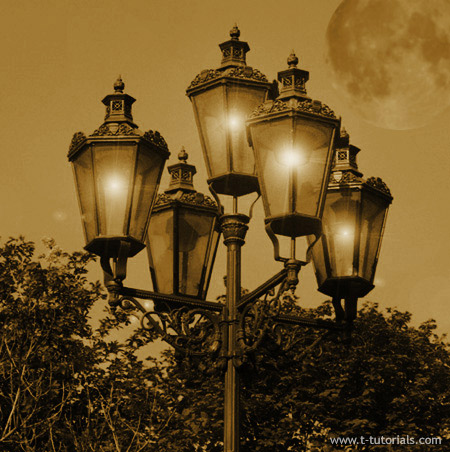
However, when using AL, everything that we add to the layer lying under the AL will be affected.
I know that it sounds a bit complicated but it really is easy.
To conclude this point, if you know that you will make more changes later on, it might be a good idea to use adjustment layer instead of normal function.
Pages
Submitted by Martin on 2006-05-24 18:24:35. Since then read 89892 times.
Scored 4.21 points out of maximum 5 by 19 votes.
Also take a look at other Photoshop tutorials...
Sparkling stars effect | Lightning Effect | Tolkiens Master Ring | Simple plastic button | Alien text |
Rate this tutorial!
Invite a friend!
Discussion
Mr. B. C. Phukan bcphukan AT indiatimes DOT com said on 2006-05-27 09:23:09Dear Martin! The Tutorials on Adjustment Layers are very useful and simply fantastic. It has helped me immensely to clearify some of my doubts on the subject. Thanks so much.
Martin mato AT t-tutorials DOT com said on 2006-05-27 09:34:18
I hope it helped. If there are any more things to clarify, let me know and I will do my best. Anyway, thx for suggestion on a tutorial.
yushatak techmaster AT myself DOT com said on 2006-06-17 17:32:17
I may well check out adjustment layers, even though most of my work is with abstracts and web design (where it's a bit less useful). BTW: Some sort of glitch in your page source on this tutorial. It's showing a if lists are supported comment of some kind. Just figured you'd like to know.
Ihaw ihaw89f AT yahoo DOT com said on 2009-04-02 18:27:42
The AL(adjustment layers) is quite easy to learn, especially the hue/saturation. But, the other more complex AL like curves and color balance as example, is harder to learn ourselves. Maybe more explanation for each will AL helps.