

Understanding Curves
Learn to use one of the most powerful tool.
Also take a look at other Photoshop tutorials...
Easter Eggs in Photoshop and ImageReady | Night Sky with Stars | Chrome effect | Making colorful web site template | Add lightning to your photo |
Curves
The function called CURVES is to be found in Image/Adjustments/Curves (or as an adjustment layer in Layer/New Adjustment layer/Curves).
I see it as one of the vital instruments for it allows you to change the lightness of the picture with considerable ease and plenty of effectivity.
To start using curves, open Image/Adjustments/Curves.
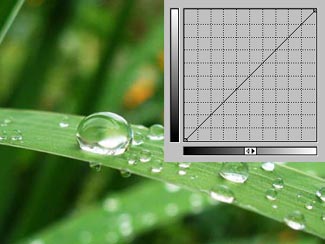
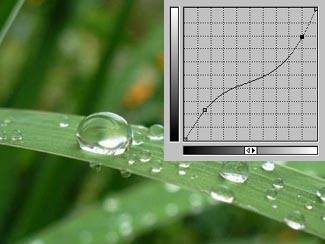
You should see two gradients and one line. By clinking on the two arrows in the middle of the lower gradient, you can swap the order of black an white in gradients. I would recommend to use the position where there are black sides of gradients in bottom left corner.
So what are the curves and what are those gradients and that straight line?
The gradients represent the lighness of pixels of the picture. the horizonatal (or lower) gradient represents lightness of all the pixels of the current picture. The vertical (or upper) gradient represents lightness of the pixels, to which will be the original pixels changed.
Well, the point is in that you can modify the line which represents the fact that from pixels of certain lightness (e.g. 50) you will after the application of curves get the same lightness (50).
So, if you modify the line, in either direction, the ratio is changed and the pixels of the original picture with lightness of 50 will be either lighter (e.g. lightness 80)
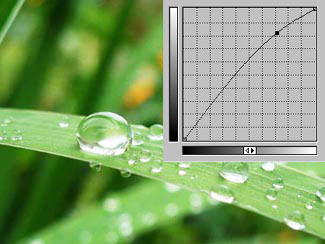
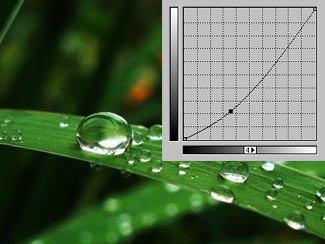
or darker (lightness 30).
This ratio is also shawn in the window of curves as Input/Output numbers.
Things to remember:
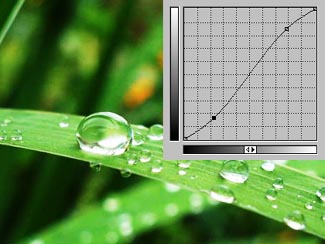
The more steeper the final line, the more contrast will the picture have.
The less steeper the final line, the more gray will the picture contain.
The more points you add on the curve and more you distort it into unnatural shapes, the more unnatural will the picture look like (though might still be very interesting to look at).
You can always add additional point just by clicking on the line, or reset the setting by holding alt and click on Reset where was Cancel before.
You can always remove a point (except of two anchor points) just by draging the point out of the curves window.
Try making an inverse of the picture; I would firstly suggest the black-and-white one; and do so by placing the left bottom anchor point to the left top position and right top point into right bottom position. The effect is that what was black is white and what was white is black (just like after a speech of a talented demagogue).
That should be all. Enjoy the Curves.
And allow yourself to experiment with them.
They wield really great potential.
So do you, right?
And if you happen to have a good idea of a tutorial (that is REALLY yours), you might wish to send us the procedure in text form and/or pictures and we will place it on our site. Be proud of what you can do.
If you liked this tutorial (or even if you didnt :) please make a Comment and Vote in the section below.
Thank you.
Submitted by Martin on 2006-03-01 15:41:55. Since then read 10254 times.
Scored 4.08 points out of maximum 5 by 106 votes.
Also take a look at other Photoshop tutorials...
Create a kite shield in Photoshop | Exploding text | Making sepia hue | Pre-press tips for Photoshop users | Gold and Diamond logo |
Rate this tutorial!
Invite a friend!
Discussion
Beren said on 2006-04-06 16:20:12I like the contents but I would like to know more about curves for they contain three different colors, same as channels and I think that might interest also other people. Maybe it would be more advanced, wouldnt it?
Leif Daniel Rognan findecano_sirfalas AT hotmail DOT com said on 2006-06-07 10:58:51
U have the ability to do so much more than me with curves cause U have larger curve options.. ehmm. U have 10 x 10 on curves. I have 3 x 4 how do you get the 10 x 10.... ??
Michael Lamy thedigitalimage AT studiostudio DOT biz said on 2006-06-19 20:30:12
So much more to curves than described. It is on of the best tools for contrast and brightness but color manipulation is left out in this article. Also, the ability to pre-set highlight mid and shadow tonal values for quick "click balancing" of images is the simplest, yet most needed function by anyone editing images.
mike kadosh AT sbcglobal DOT net said on 2006-11-08 17:56:08
I believe that you should have at least two more examples of how to use the curves
vikash sharma feelfree159 AT rediffmail DOT com said on 2007-07-10 10:47:43
alt+click on the grid to change it to 10 x 10