

Flawless Collage of two Panorama photos
Merging of two different photos is not a problem with this tutorial. Learn more about it.
Also take a look at other Photoshop tutorials...
Modern Art in Blue | Making abstract wallpaper | Red Glass Button | Creating a stylish portfolio | Crumbled old paper texture |
Pages
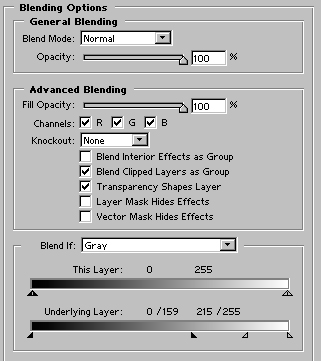
Blending Options
Call the Blending Options window by doubleclick on the Matterhorn layer.
What we will do now is that we will adjust the way in which will the top photo react (or interact) with the photo under it. At the bottom of the window you have just called, you see two black and white gradients.
If you want to understand what they do, do the same as I do.
First, move the left black slider of the top gradient to the left. Rocks on the right are gone!! What have just happened?
Well, you have just set that all parts of the top picture that are to the left of the position of the slider will become transparent.
Now, move the left top slider to the left and the similar will happen - all parts of the top picture which are to the right of the position of the white slider (here it is snow) are transparent.
With the second gradient it is something similar. First move the black slider to the right. What happened now? Every part of the lower layer that is darker than the sliders position (that is to the left to the slider) will appear.
Move the white slider to the left and it will cause all parts of the lower picture which are to the left to the slider will become visible.
I hope it was clear enough. It should.
But there is one more thing that will make your work with Blending Options even better. As I said in many other tutorials, the change should be always gradual if you want the final outcome look natural. So in this case.
I am sure that you have noticed that all moves of the sliders caused pretty sharp interactions that really didnt look nice. Here comes the Change.
Hold Alt whe moving the slider and it will split into two separate part, one remaining on the position, one moving where you want.
So?
Is it better? I am sure it is. By that we have made the layers interact in much more gradual way that will make smooth merge of the parts.
Now, lets go back to our Collage.
We have opened the Matterhorn Blending Options right? So use the following settings:
After reading everything in the part a few paragraphs above, you shoud fully understand what I actually did. At least I hope so :D
You should see this:
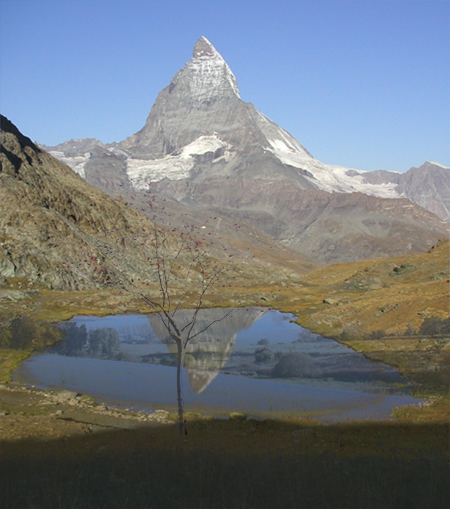
As you see, ther are still some parts which are not really desirable.
So what we do now is that we will make a Layer Mask and hide those parts.
In the case you are not sure about what Layer Mask is or how it works,
read our All About Layer Mask tutorial.
Swich to the layer mask of the matterhorn and use Gradient tool with colors from Black to Transparent. (You will do this by restarting the colors - press D, and by clicking on the gradient icon on the top and choosing Black to Transparent)
With this tool, mage gradient from the bottom to the half of the picture, approximately to the part where the lake sky on the bottom picture starts.
Use also black soft brush to paint into the layer mask on specific places to hide the lake behind the trees. If you did it too much, use Ctrl+Z to go one step back, or just press X to swap colors and paint with white to make that part visible again.
It should now look like this:

Pretty nice, huh?
Yet I am not satisfied.
Pages
Submitted by Martin on 2006-04-24 14:27:57. Since then read 122436 times.
Scored 4.52 points out of maximum 5 by 50 votes.
Also take a look at other Photoshop tutorials...
Space flight simple | Simple plastic button | Retouch of panorama | Exploding text | Slim button |
Rate this tutorial!
Invite a friend!
Discussion
Mr. B. C. Phukan bcphukan AT indiatimes DOT com said on 2006-05-03 12:57:35Martin ! Another masterpiece in Photoshop Tutorials which is not found generally found on the Net. Thanks once again.
Martin mato AT t-tutorials DOT com said on 2006-05-03 17:02:14
I am very pleased to hear that!!! I am glad you like my tutorials and that you leave a comment behind. Without feedback, tutorial-making becomes really dull. Thx once again. :D
Count Azurit said on 2006-05-13 21:07:03
I see you have made quite a name here ... But I have to give you credit for your tutorials ... they are really nice.
Martin mato AT t-tutorials DOT com said on 2006-05-13 22:11:35
Thx, I am glad to hear that, esp. from you, friend. Btw, if there is anything new about our Dreamfall, please be that kind and let me know. I hope your page will flourish as well and I shall be honored to take part in it if invited. Meet you at the Fringe caffe someday.
jbog91 said on 2006-05-20 04:56:42
Awsome tutorial. Very original. I've never found something like this and I could definately use this. Thanks man.
Martin mato AT t-tutorials DOT com said on 2006-05-24 11:52:07
I am glad it hepled. For future, if you are having problem with something in PS, just let me know and I will try to help. And also if you think that you could use a tutorial on certaion topic, let me know and I will do it. I amt your service, eager to held :D
Helmutt said on 2006-11-25 11:13:21
Thank you for providing these tutorials. I really like the way you use your own photographs with all their inherent difficulties. The results are great. I look forward to reading the other tutorials.
Martin mato AT t-tutorials DOT com said on 2006-11-26 11:23:09
lol, I like the word inherent, though I prefer the word implicit :) I am glad that you like it.
Anonymous said on 2008-03-05 20:13:20