

Post-it-note
Make a flawless Post-it-note very easily.
Also take a look at other Photoshop tutorials...
Dewy window | Easter Eggs in Photoshop and ImageReady | Vacation and holiday accessories tips | Vectors, paths, curves and arrows | Retouch of panorama |
Making a Post-it-note
1. In a new layer, make a rectangular selection and fill it with something around yellow faeb57
2. Make triangular selection using polygonal lasso tool
2. Make triangular selection using polygonal lasso tool
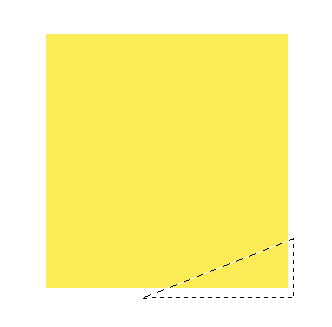
3. Delete the selection.
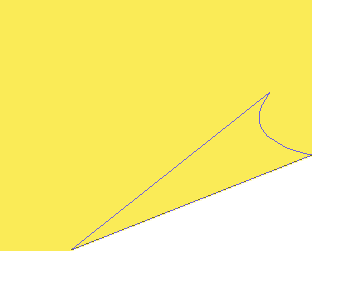
4. Use the Pen tool to make a new path of a shape like in my picture. Remember to use the setting Paths in the top left bar.
(start in tha left, than right and only after with the top anchor point. When making the last hypotenuse-like part, click on the top anchor point holding Alt. By this you cancle one part of the anchor point and you will make nice sharp continuing line.)
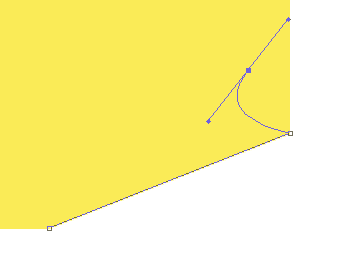
5.Go to paths window, click on the path holding Ctrl to select it
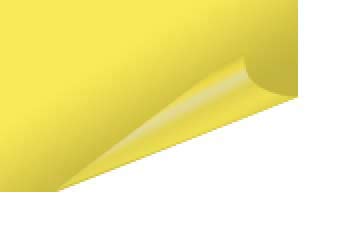
6. Gradient tool, setting like in the picture, just try to make the gradient till it looks natural. Use darker colors as the edge ones and whit with lower opacity as the highlighted part. Just try.

So it looks like the one below.

You can always go one step back with Ctrl+Z, or in history window. So you did this in the new layer, right? Good.
7. Now select the yellow rectangle layer, Ctrl+Click on its icon to select it
8. Again, use the gradient tool with the settings like in the picture to make a shade under the note.

9. Merge the two layers (note and rectangle) (link and merge or select and merge)
10. Now, use the eraser (hardness 75)and get rid of the sharp point on the right. It will look much better.
11. Double click on the layer, set Drop shadow (opacity 29, Distance 13, Spread 9, Size 38)
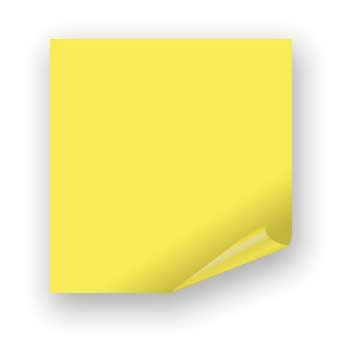
12. We are done. Papererworks :)

Enjoy
And if you happen to have a good idea of a tutorial (that is REALLY yours), you might wish to send us the procedure in text form and/or pictures and we will place it on our site. Be proud of what you can do.
If you liked this tutorial (or even if you didnt :) please make a Comment and Vote in the section below.
Thank you.
Submitted by Martin on 2006-03-27 16:18:21. Since then read 72866 times.
Scored 4.22 points out of maximum 5 by 50 votes.
Also take a look at other Photoshop tutorials...
Add lightning to your photo | Blue Matter | Weathered stamp/flyer | Bevel and Emboss tutorial | Learn to use Quick Mask |
Rate this tutorial!
Invite a friend!
Discussion
Beren said on 2006-03-27 20:59:08Good looking, I would post it on my fridge :)
BOb said on 2006-05-04 08:50:52
pretty good but for those of you who have cs2, hit command+T (ctrl+T on a Windows) and click warp. this new feature allows the same thing except a lot easier and the outcome can be much more impressive
Martin mato AT t-tutorials DOT com said on 2006-05-04 15:03:27
Yes, true, that is another way of making the distortion of the bottom-right corner. I dont use it much but it seems to offer wider range of options for distortion. thx BOb.
eastcoastjac jacs AT weblogic DOT co DOT za said on 2007-02-20 08:53:05
Try ths too: instead of drawing the curved piece from scratch - when you cut the corner off the square use your layer menu to make a new layer via cut. Then just rotate it, and use a circular eraser brush to remove the bit on the right to make a curve. Saves a few seconds :-)
Naomi ikklexdevil AT hotmail DOT com said on 2008-06-11 13:03:24
Hey I can't find the gradient settings in CS2! Could anyone tell me where they are? Great tutorial though :)
Matthew Miller mamiller93 AT gmail DOT com said on 2008-07-01 23:53:13
this tutorial was good, but I would have preferred the tutorial to show how to do both sides of the post it to have a curl since in a real post it note, if there is a curl in one side, there is usually a curl in the other side. Just a suggestion!
YaWie fuckyou AT xs4all DOT nl said on 2008-10-30 14:33:32
What a lousy tutorial. You can't put a fucking gradient in a selected path