

Learn to use Quick Mask
Quick mask is a phenomenal feature that lets you to create fairly complex and usable selections.
Also take a look at other Photoshop tutorials...
How to create a blueberry | Exploding text | Red tissue | Autumn leaves | TV-lines |
Pages
Anyway, if you would like to change the settings just doubleclick on the Quick Mask icon I showed you before, in the main toolbar (it is the one on the right).
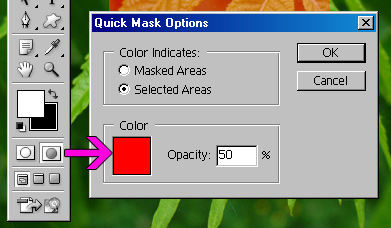
If you choose 'Selected Areas', you will get my settings, so the one I will use further. You can as well change the color and its opacity but in my opinion the default choice serves the purpose.
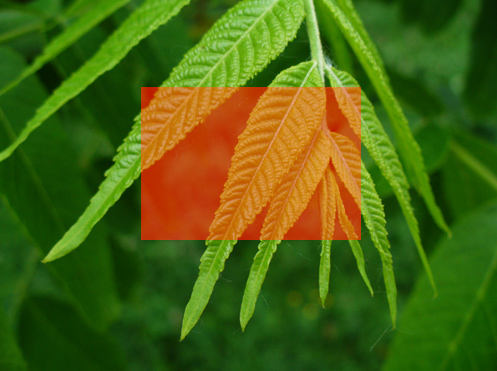
So, what we have now is the rectangular selection filled with red, right?
Now, and this is important, the Quick Mask, likewise the Layer Mask (a tutorial about which I plan to submit in due course) works on that principle that you can work with it with ANY painting tool and with ONLY black and white colors.
To understand what I mean, click on the brush tool and select the front color to white (press D to reset colors to black and white, and X to swap them).
Now, paint in the rectangle and look what happens.
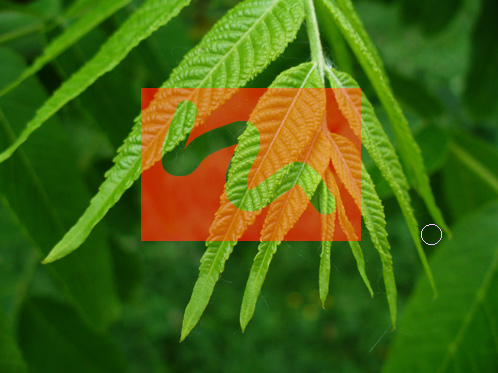
It erases the red, right? And what is red? The selection, yes. Now go back to normal mode by clicking on the left icon in the main toolbar or by pressing Q.
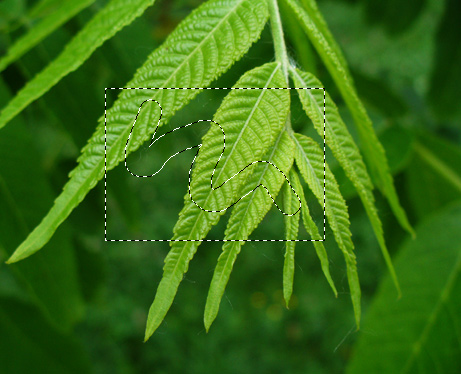
Now you have this selection that would be a bit problematic to get with Marquee or Laso. You can now use any effect or tool on it - I wanted just show how to make a selection.
Remember, if you have made more complicated selection, remember to save it in Select/Save selection. And also, when you are done with a selection, you can deselect it by Select/Deselect or Ctrl+D.
Or, if you wish to move a selection, click on Marquee tool (basic toolbar on the left, top left icon), click on the first icon of four (on the far top, it says New selection) and hold the selection at some place inside it. And move.
I know that the picture is not any masterpiece :) but I am sure it clearly demonstrates that we have just made a selection with composite shape and it is here, just like a normal selection and is ready to be used.
Part III. - Medium examples /filters in quick mask/
So we are in the picture, in NORMAL mode (just for now). Now we want to make a bit more complex shape that definitely could not be made by Laso or Marquee tools.
We will use filters. To begin with, make another selection with rectangular marquee tool and proceed to Quick Mask.
Normally, if you wished do make a selection with half-transparent edges, you would use Select/Feather and set no.of pixels. You can do the same thing by QM.
Pages
Submitted by Martin on 2006-04-05 18:13:05. Since then read 176585 times.
Scored 2.77 points out of maximum 5 by 315 votes.
Also take a look at other Photoshop tutorials...
Modern Art in Blue | GOLD - the golden writing | Tattoo transplantation | Easter Eggs in Photoshop and ImageReady | Vacation and holiday accessories tips |
Rate this tutorial!
Invite a friend!
Discussion
Beren said on 2006-04-05 18:17:19I like when pages keep the size of the pictures to the minimum, but in this case, the compression shouldnt be so tough. Nice things in this one though.
coyito said on 2006-04-12 08:08:15
emm, i read this article because i've seen the button of quick mask mode but didnt knew for what was for, the tutorial is simple , but it gets to the point and shows you what i quick mask mode, and what can be done with it.
g said on 2006-04-12 19:18:28
I dont understand and cant follow it nill poin
Micah said on 2006-04-12 20:07:21
Wow, I am finally beginning to understand masks. Thank you so much!
Evil Genius said on 2006-04-12 22:11:47
Nice man, thanks for the tutorial on quick masks.
newbie said on 2006-04-15 14:09:40
ye i am begginer and i must say that ur text explained me very much THX
elly elly_270684 said on 2006-04-25 04:11:46
thanks, for your tutorial, it really helped me
Mukul boredbeyondbelief AT cooltoad DOT com said on 2006-04-25 07:19:13
I really liked your tutorial. I had never quite grasped how powerful the quick mask tool really was...your illustrations showed me what was possible!
Mr. B. C. Phukan bcphukan AT indiatimes DOT com said on 2006-05-03 12:45:25
Martin ! Just excellent. It has cleared lots of my cnfusions regarding QM and Adjustment Layers. Many thanks.
Mr. B. C. Phukan bcphukan AT indiatimes DOT com said on 2006-05-06 04:58:28
Martin! Masking a small portion of a large canvas through QM and applying your desired Layers styles/Filters/Blend modes is great. I learned a lot from your Tutorial. Thanks again.
John1024mb said on 2006-05-20 16:02:21
Thank you for this tutorial. It has been a learning experience.
photoshop_fan said on 2006-06-01 21:48:24
Your tutorial is VERY NICE. Finally able to understand quick mask and layers. THX!!!
diefroggy242 diefroggy242 AT yahoo DOT com said on 2006-09-06 06:40:46
This tutorial was extremely helpful. i had no idea what QM did and that makes making selections one hell of a lot easier. thanks
Bob bfpmail AT peoplepc DOT com said on 2006-11-20 04:13:22
I must've hit a key somewhere while in quick mask..... The opacity of the selection is almost transparent. I've got the opacity of qm set at 100 for painting the mask....but when I exit qm and copy my selection to another layer...it's transparent..(even though the opacity for the new/copied layer is 100%) I can lasso or marquee a selection and copy that...it works fine. Only in QM am I having the transparency issue. Any thoughts? Thanks, Bob
Martin mato AT t-tutorials DOT com said on 2006-11-24 12:45:24
I willl try to help. So, you swiched into the quick mask, right? You painted with a brush in it and got a selection (marked red&transparent). You leave QM, you get the selection in that moving line (simply normal selection). So, what might be the problem? Perhaps when using the brudh make sure that its opacity and flow is at 100% so that you select the pixels completely. Another thing. Maybe what you ment is that you do use copy 'n paste while in quick mask. Well, I dont thing it will copy something in this mode. You need to ext QM to copu part of the picture you selected. And the last thing, although very unprobable one, when you double click the QM icon in the pallete bar, there you can set the opacity of the red color. Thats all I can think of at the moment.
Azurit said on 2007-01-03 02:35:56
I see your tutorials continue to sport great photos and great results with them. I still don't get the whole schisofrenia thing though.
Deb whitecrow AT onaustralia DOT com DOT au said on 2007-06-03 06:21:13
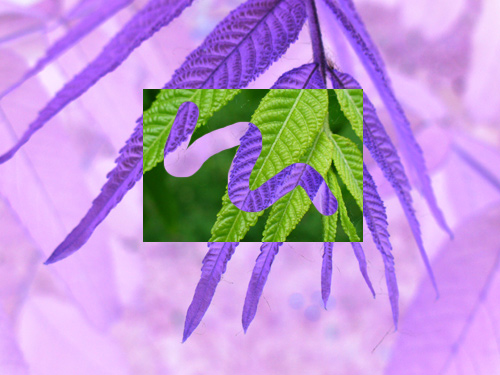
I am a real beginner and had a coupla questions - in Part 2 where you made the outside of the QM selection purple, and left the QM rectangle as green, how did you do that? Each time I tried I kept losing my selection. I did try to save it and then turn the leaves purple, but then couldn't get the QM squiggle back... Sorry! Probably obvious to all you exprienced PS people!!! Any help gratefully appreciated. And also many thanks for the tutorials!
Mato mato AT t-tutorials DOT com said on 2007-06-03 11:34:30
To answer your question... I am not quite sure I understand what is the problem. Hmm. But to give you some hints on this tutorial, you do not need to save the selection (Select - Save Selection). You only work in Quick Mask (get there by pressing Q) and when you make a selection you want, press Q again and you have normal selection instead of the quick one. If you end up with just the opposite selection than you wanted, just go Select - Inverse selection. If you have more quesries, write me an email and describe them in detail.
Disintegral roadkillroy AT graffiti DOT net said on 2007-10-14 23:36:37
I'm having the same problem. Flow and Opacity are both at 100%. I originally thought that the airbrush might be selected but it isn't. How it works is I got to Quickmask, use the pen on my tablet to draw (it's a lighter pink, indicating a lower capacity, but I can't find a place where the opacity IS lower than 100%). When you exit QM, it selects EVERYTHING, with no negative selection for the Inverse to snag. Of course, when you go back into QM, everything is still intact. Dunno if it's a bug or something in the program or maybe I hit one of those wonderful quick keys I haven't learned yet...
Disintegral roadkillroy AT graffiti DOT net said on 2007-10-14 23:44:29
Don't know how it happened but something knocked it into the tool presets but it wasn't registering it. I selected one of the presets, then changed the settings back to what I wanted and it seems to have corrected the issue...
major said on 2008-05-13 17:36:24
im not to keen on the style but i like the way you explain it if i was going another direction with this you help alot thanks
xzcxzc zipzoner AT gmail DOT com said on 2008-08-12 00:49:00
damn i don't understand coz i can't speak english but i try autodidact with see the picctures and cool that's workzz
jONATHAN said on 2009-09-19 06:24:59
This tutorial helped me understand the use of mask. it really helped
Tanya said on 2009-11-18 16:59:58
Wow, a lot to think about. I like the last few sentences.
xtreme juv_99999 AT yahoo DOT com said on 2010-03-01 08:28:13
thanks... its help meh a lot!