

Sparkling stars effect
Learn how to create a sparkling clean stars effect with this photoshop tutorial.
Also take a look at other Photoshop tutorials...
Tolkiens Master Ring | Vacation and holiday accessories tips | Tattoo transplantation | Red tissue | Easter Eggs in Photoshop and ImageReady |
Pages
Sparkling stars effect
This tutorial was made by Andrei Bilan and is used by t-tutorials thanks to his courtesy.Please visit the original page as well,
http://andreibilan.blogspot.com/
Here goes... my first Photoshop tutorial; in this tutorial we will learn to create a very nice sparkling effect and added to a photo, like the one you see below.
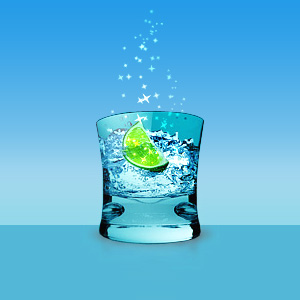
First of all, we need to understand what the sparkling effect is composed of: lots of stars arranged in random positions and having different sizes. The bigger stars should be in the middle, whie the smaller stars should be positioned on margins.
STEP 1
We need to create a star that will be the base of our effect. Let's start by opening a new work document with 21x21 pixels. You can change this size according to your needs. Now select the Pen Tool and draw a star shape like you see in the picture below (in the photo you have the star shape at 100% and 1600% zoom):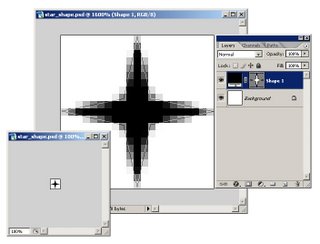
Now, this shape must be rasterized; this can be done in two ways: by right-clicking on the star shape layer we just created and then selecting Rasterize Layer from the options available or by selecting the star layer and then going to the layer menu and select Rasterize > Layer from the drop-down menu.. so it's Layer>Rasterize>Layer.
We must use the star we just rasterized as a brush. We do this by selecting the star layer and then go to the Edit menu and select Define Custom Shape then click OK.
STEP 2
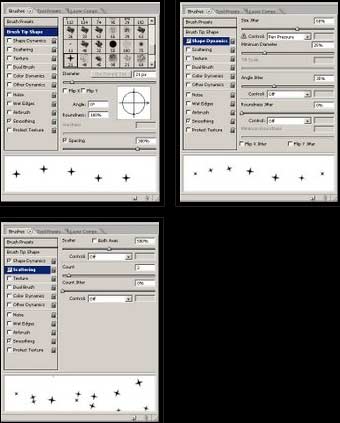
Now with a few brush present we can do that sparkling stars effect you saw in the upper examples. Open the Brushes Palette and let's start: from the Brush Presets select our star brush we just created (it's the last brush on the menu), then from the Brush Tip Shape set the Spacing to 250%-350%, from the Shape Dynamics set the Size Jitter to 40%-60%, Minimum Diameter to 25%-35% and Angle Jitter to 35%-65%, leaving the rest of the options default, and in the end from the Scattering option set the Scatter to 450%-550% and Count to 2 or 3. For a better understanding, you have 3 printscreens of what these presets should look like.
Pages
Submitted by Martin on 2006-09-23 19:31:34. Since then read 46824 times.
Scored 4.37 points out of maximum 5 by 19 votes.
Also take a look at other Photoshop tutorials...
Easter Eggs in Photoshop and ImageReady | Tolkiens Master Ring | TV-lines | Tattoo transplantation | Glowing magical vector logo |
Rate this tutorial!
Invite a friend!
Discussion
Clarissa clarissa_f_1999 AT yahoo DOT com said on 2007-08-08 00:17:19Thanks for the tutorial. I am just starting out on Photoshop and your tutorial was very easy to follow. Thanks!