

Bevel and Emboss tutorial
Visitor requested tutorial, thoroughly explains Global Light, Bevel and Emboss usage.
Also take a look at other Photoshop tutorials...
Modern Art in Blue | All about Layer Mask | Making tiles | Red Glass Button | Lightning Effect |
This tutorial is made on the request of one of our readers, Adrian.
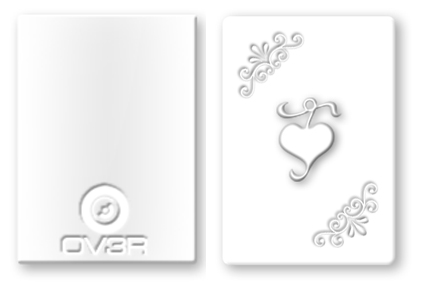
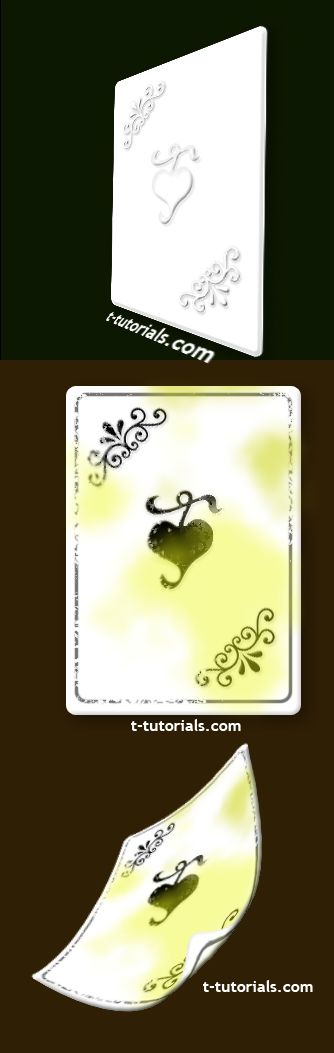
He has sent me this image asking how to make such an effect. So, on the left is the picture he sent me, on the right is what I will explain how to do here.
1. To begin with, make a new doccument with a white background.
2. Next, use the Rounded Rectangle tool to make nice Rectangle Path.
If you have no idea what a path is, imagine it is just a couple of points, connected with lines that are called vectors. Because these are nust border points connected with vectors, the whole image (or selection) is vector based = if you increase its size, it will be still acute and with sharp edges (not like as if you enlarged a small image that is bitmap-based = it consists only of points that have colour and are next to each other)
3. Make a nice Rectangle but leave some space around it, so that its shadow will be still in the picture.
4. Now, you have a path. It is not a picture, it has no colour, it is not a selection. At least not yet.

5. Open the Path panel (or go to Window/Paths) and click on the Work Path, and click on this Load path as selection.
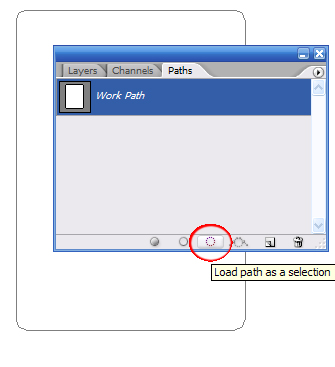
6. Go back to the Layers panel, make a New layer, and fill the selection white (Edit/Fill). The reason why we are doing this is that we will need something tangible to apply the effects to. So, by filling the selection white, we have something to build on and also something that our selection is saved at (sort of). But now, lets add some cute effects on the rectangle.
7. Double click on the Rectangle layer to open its Blending Options. Click on the Drop Shadow section and use these settings: Opacity 34, Angle 143, Distance 8, Spread 6, Size 18.
Now click on the Bevel Emboss section and use these data: Chisel Hard (you can choose also the others, doesnt matter), Depth 23, Size 5, Soften 0.Hit ok to save it.
You should have obtained something like this thingy.

8. You might have noticed (I am sure you did) that there is this Global Light option in both Drop Shadow and Bevel Emboss. The point I am trying to make is that you can use the global light so that it looks like the light is comming from one place and shines on all of the layers, or you can uncheck the box next to Global Light, and set the special light and shadow settings for the layer. hmm.... example?
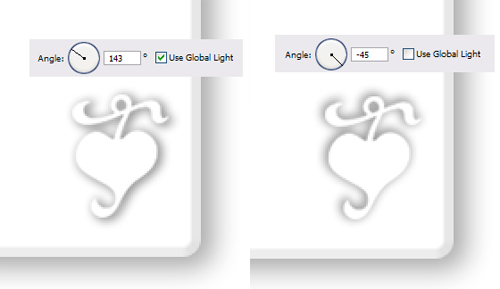
Look at this. On the left, there is this Object with Drop Shadow set to use the Global light. You can see that the direction of the shadow quite matches the direction of the shadow of the rectangle in the background.
Now look at the other one, on the right. The shadow of the object doesnt match the shadow of the rectangle in the back... so it looks... kinda.. not real or not homogenous. I hope it is clear. We will learn a couple of such thing in this tutorial. Just continue reading :D
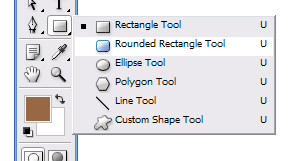
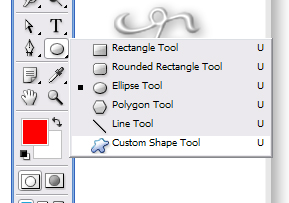
9. Now we will add some more objects on the rectnagle. To begin with, use the Custom Shape tool
Use whatever object from Adobe Photoshop given ones, I have used this one.

10. And again, the same procedure as explained before. Click on the Paths window, make selection from the Path, make a new layer and fill the selection white.
11. Double click on the Layer and in Blending Options play again with Drop shadow and Bevel Emboss.
The thing I want to show you here is the Bevel UP and Bewel Down. Look at this pic.

What do you see? ha? I will tell you what I see. From an aestetic point of view, the thingy on the left is concave... so that I could touch it as if I was reading braille writing for blind people.
The other one, on the right is.. sort of pushed inside, so I could pour water into it. This is the effect of the UP and DOWN Bevel. Alright?
And, from the Photoshoper point of view, the one on the left has been made by Bevel up and a slight Drop shadow, whereas the one on the right by Bevel Down, no shadow required cos it is not concave, but I added just a slight Stroke (the last section in Blending Options, size 1, opacity 5, colour black)
I hope ot is clear how we did this.. Is it??? :D
12. So, the question is what effect to use and what overall impression do you want to achieve when making this 3D effect. A piece of marble with something engraved on it? Or a pale playing card? (Perhaps not that pale after all)
Just adjust the details and the effects and the impression is yours to decide !!
Hope you liked the tutorial. I would be grateful if you could express your opinion by voting below about how you liked this tutorial.
It would be great if you could also leave a comment in the section below.
Martin
Submitted by Martin on 2007-05-19 11:34:18. Since then read 67458 times.
Scored 4.24 points out of maximum 5 by 49 votes.
Also take a look at other Photoshop tutorials...
Easter Eggs in Photoshop and ImageReady | Pre-press tips for Photoshop users | Red Glass Button | Making sepia hue | Autumn leaves |
Rate this tutorial!
Invite a friend!
Discussion
Mato mato AT t-tutorials DOT com said on 2007-05-19 11:38:51Well, the most amusing part when creating this tutorial was to make that dirty and rather old looking playing card. I have really enjoyed it a lot :D I am thinking about making a tutorial how to make such a damaged and used look to a playin card, so if anyone is interested, leave a comment and I will make it.
Mya prettieyes29 AT msn DOT com said on 2007-09-08 03:11:08
yeh.do make that tutorial i would really liek to learn......by the way.good work on the tutorial above martin(^_^)
טוהר צדיק טוהרר said on 2009-03-19 18:30:13
טוהר_צדיק ב×רשבעית||11||×¥]ווסה