

All about Layer Mask
It is often used for preventing part of the layer from being seen. Worth seeing.
Also take a look at other Photoshop tutorials...
Lightning Effect | Easter Eggs in Photoshop and ImageReady | Tolkiens Master Ring | How to create a blueberry | Tattoo transplantation |
Pages
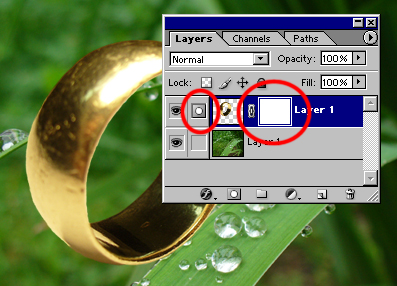
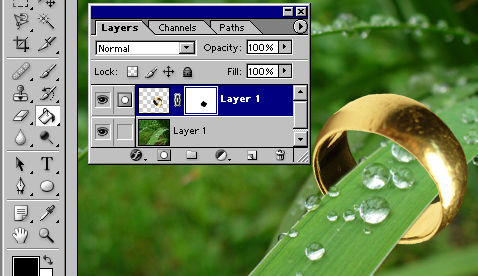
Now you should have a white square to the left of the layer. Notice it is whole white - this represents that all parts of the layer are yet visible. Also notice that is it the same size as our image - meaning it covers whole size of the layer. I have also marked the other thing. To know that you are currently working in a Layer Mask and not in the layer itself, PhotoShop shows a little icon to the left of the layer.
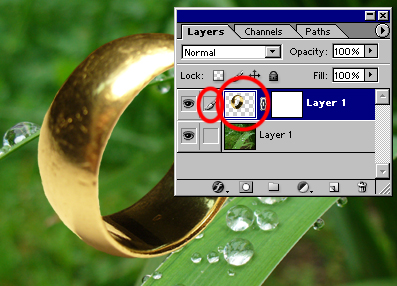
To work in the normal layer, click on its thumbnail on the normal layer. The icon on the left of the layer instantly changes to a Brush symbolizing that you are now working with the layer. To work with the layer mask again, click on the thumbnail of the Layer Mask to the right of the layer thumbnail (in ours on the white square).
So now we should be in the Layer Mask. (By the way, remember to rotate and resize the ring by pressing Ctrl+T).
In the LM, we will work only with painting tools - Brush, Paint Bucket, Gradient...
The following will be similar to the Quick Mask.
In the Layer Mask, you paint on the white rectangle you see as a thumbnail but you dont see it. What you paint BLACK will cause that the corresponding part of the layer to be invisible. What is left WHITE will cause the corresponding part of the layer to remain visible.
Those smarter surely know that if you pait with a grey (which is just Black with lower opacity), you will cause that part of the picture to be half visible. The same smarter people surely know that if you use other colors instead of Black and White, the PhotoShop will automatically take the lightness of these colors, which is again measured as a degree of grey. So paint light red and you get the same effect as with light grey. Simple.
Lets try the following.
While in the layer mask, use Gradient tool with Black and white colors. (to set those colors, just press D). Use the gradient tool and make a gradient across the ring. Dont make it too long because you will decrease the opacity of the whole ring. You can see the gradient you have just made as a thumbnail next to the layer.
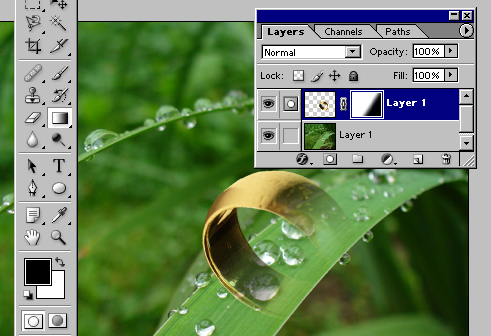
Looks veeery nice, doesnt it? Well, I like it. But let us not hesitate, lets proceed to the other stage, we will put the ring on that grass stem :)))
But we have made the gradient that will not be needed further. So, take Paint Bucket tool and fill layer mask with white. Whole ring should be visible again.
Now, we wil fill that part of the layer mask (that corresponds to the black part of the ring that will be under the leaf) black, as to make it invisible.
To do so, we will first make a selection of what we want not to see. Click on the EYE next to the ring layer to hide it temporarily. Use the Magnetic lasso on the leaf to select the appropriate part.
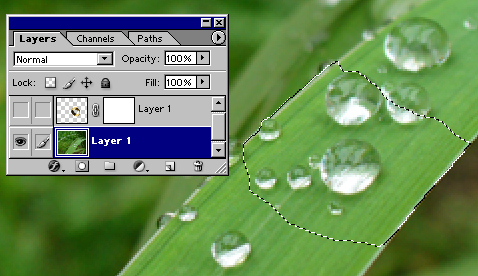
Now, use Select/feather, pixels 1 to make the edges of the selection less sharp and to make it look a bit better.
Click on the Ring layer (should be visible now) with the selection still selected, click on the Layer Mask again, and use Paint Bucke to fill the selection with Black.
See?
What you see painted black on the thumbnail is hidden. Easy.
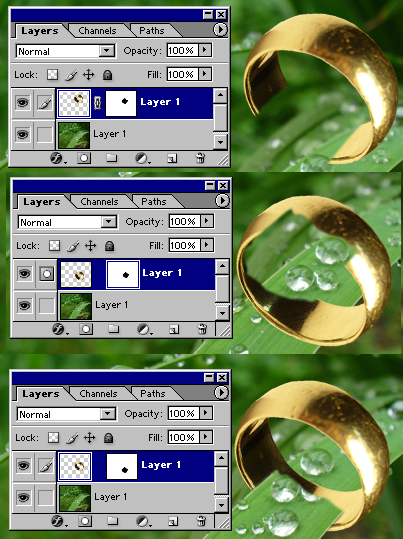
One more thing. Notice a piece of chain between the Layer Mask and layer. It suggests that if you move one, the other will follow. Try to unchain it by clicking on the chain and move it to see what it does.
In the first picture, the two are linked and moved together.
In the second one they are unlinked and only Mask is moved.
In the third one they are unlinked and only Layer is moved.
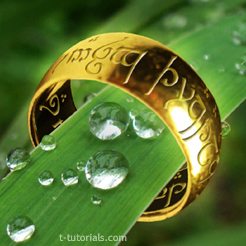
If you happen to be interested what coud be done with already started retouch with ring and a grass, see what I have done. Check my tutorial Tolkiens Master Ring.
So by now, you should understand the basics of Layer Masks and the way they work. We do not use them only for normal layers but more for Adjustment Layers, which are again very practical and vital to understand.
Lets continue with the usage of Adjustment Layers.
Pages
Submitted by Martin on 2006-04-16 22:45:02. Since then read 138606 times.
Scored 4.27 points out of maximum 5 by 152 votes.
Also take a look at other Photoshop tutorials...
Dewy window | Autumn leaves | Gold and Diamond logo | Sparkling stars effect | Vectors, paths, curves and arrows |
Rate this tutorial!
Invite a friend!
Discussion
Inu Inuyashatrigun2 AT yahoo DOT com said on 2006-05-02 20:17:11Why LM when you can just copy and past the grass over the ring, or erase the ring iteslf. Seems like more work you way.
Martin mato AT t-tutorials DOT com said on 2006-05-03 09:19:47
If you didnt notice, this tutorials is called ALL ABOUT LAYER MASK. I guess that is good reason for using LM instead anything else :D But I agree, and you can find it also in the tutorial, that there are plenty of options how to do one specific thing in Photoshop. So if you erase something or use layer mask, the result will be the same. Perhaps with only one difference; with eraser what you erase is GONE FOREVER but with Layer Mask, you can just discard the LM or fill it with white and you are there with the original object. Myriads of options.
kipster cj DOT cariola AT yahoo DOT com said on 2008-01-08 07:11:57
Really nice tutorial, very helpful! thanks!
Suruchi suruchi_suchi AT yahoo DOT co DOT in said on 2008-04-23 14:22:17
thnanks for this
xzcxzc zipzoner AT gmail DOT com said on 2008-08-11 22:45:33
very helpfull for beginner like me thx
K Stevens Krstevens AT weber DOT k12 DOT ut DOT us said on 2008-09-12 19:40:01
I am having trouble with my layer masks. I seem to be able to delete pixels when my foreground color is black, But sporadically I cannot resore pixels with white as the foreground. I would really appriciate any into you have. I have tried reading up on the subject and cannot find any trouble shooting info.
K Stevens Krstevens AT weber DOT k12 DOT ut DOT us said on 2008-09-12 19:45:37
I am having trouble with my layer masks. I seem to be able to delete pixels when my foreground color is black, But sporadically I cannot resore pixels with white as the foreground. I would really appriciate any into you have. I have tried reading up on the subject and cannot find any trouble shooting info.
George Machen gmachen AT triad DOT rr DOT com said on 2009-04-24 16:55:59
Is there a one-step way or command key to make a Quick Mask overlay on the main image out of its Layer Mask, and its edits go back to the Layer Mask? I'm trying to avoid the cumbersome steps of "Load Selection, Save Selection, etc., to accomplish that.
Simon datapeoplegraphics DOT marketing AT gmail DOT com said on 2011-03-02 09:27:57
Amazing,useful tutorial of layer mask Photoshop. datapeoplegraphics.com/layer-mask.html. I guess layer masks in Photoshop can be the important elements to generate multi-layered composite and versatile images. Layer Mask is more applicable when clipping path alone cannot work properly on complicated or complex images like hair mask, fur, semi translucent or transparent images. The main feature of Photoshop Layer masking is it is one of the most powerful Photoshop functionality and this can overlay over the top of each variety of pictures or images.Another point i think the layer mask operation is more easy then compare to quick mask option in Photoshop. Thanks.....For your tips of Layer mask Photoshop....Great !!
Danielle dasikins AT yahoo DOT com said on 2011-04-09 16:33:15
Great tutorial! I am learning photoshop on my own and this was a very well laid out step by step tutorial. Thanks for taking it by each piece and explaining the basics of each step. Keep up the good work!
Shumi transcriptionservices AT yahoo DOT com said on 2011-10-22 10:45:19
Very good tutorial.Well written and thanks for the detailed picture. http://transcriptionplace.com
Shumi clippingpath DOT specialists AT gmail DOT com said on 2011-10-22 10:46:24
Very good tutorial.Thanks http://www.clippingpathindia.com