

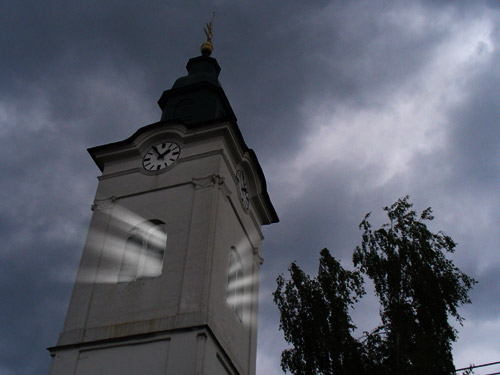
Light in the Tower
A little haunting effect that can be used in variety cases.
Also take a look at other Photoshop tutorials...
Alien text | Slim button | Weathered stamp/flyer | Colorizing a Grayscale image! | Vacation and holiday accessories tips |
Pages
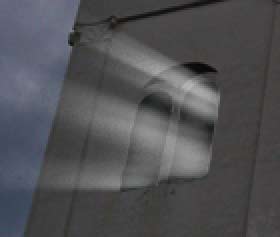
7. Use Filter/Blur/Radial blur (use ZOOM) and adjust strength so that it looks appropriate (I used about 75). Also try clicking in the picture and drag the zoom centre somewhere in the left right of the picture.
8. Duplicate the layer and blur the other layer a bit too (also this layer should be in screen mode)
9. After looking good, merge the light layers (link and merge or select and merge)
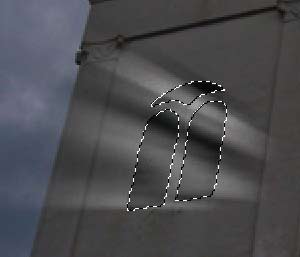
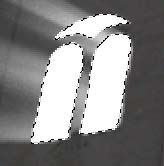
10. Load the selection you have saved before Select/Load selection , press Shift+Ctrl+I to select inverse, or use Select/Inverse
11. Use eraser tool to erase those parts of light that is in this inversed selection and could not physically be seen.
12. What I also did, but I think that it was not that necessary, was that I filled selection with white in a new layer, changed layer mode to screen, double click on the layer to call layer style window, in Blending options I chose fill opacity ZERO, and than change inner glow settings. I set the color to white and play with the settings a bit. What we get is small (pretty small) glow inside the window of the tower.
13. I also added the lightrays to the other window by the same procedure. On my example you can see that perspective really is crucial and that despite it looks pretty nice it doesnt fit somehow, the front window on particular. Imagine where the light source would have to be in the case of one window and in the case of the other. Try to make it better, and if you wish, we may add your picture to our tutorial for others to see.
Hope you liked it.
Pages
Submitted by Martin on 2006-03-29 17:18:08. Since then read 62475 times.
Scored 4.3 points out of maximum 5 by 37 votes.
Also take a look at other Photoshop tutorials...
Vacation and holiday accessories tips | Creating a stylish portfolio | Tolkiens Master Ring | Space flight simple | Flawless Collage of two Panorama photos |
Rate this tutorial!
Invite a friend!
Discussion
Elena mystra307 AT hotmail DOT com said on 2006-04-19 01:22:51It's really fantastic and a very useful effect. In addition, I like the composition, lightness, perspective and colours of the picture. I
Martin mato AT t-tutorials DOT com said on 2006-04-19 15:13:05
Thx, I am very flattered :D All of the photos I demonstrate the tutorials on are my photos, perhaps except the EYE tutorial or TV lines. I like that you like them. What do you think about the header one? I mean the water drop in my garden? Anyway, photography and graphics are my life :))
Elena mystra307 AT hotmail DOT com said on 2006-05-12 03:21:35
The header is a very fantastic picture. All of its characteristics are impressive, especially the light's effect of the water drops, the constrast and the scene. In fact, I think pictures of tutorials are very beauty and original. Really, this web is very cool. Tutorials are concise and well-explanated, plenty of original and imaginative ideas. And I like photography very much and design too, although I'm a beginner.
Martin mato AT t-tutorials DOT com said on 2006-05-12 19:22:55
I dont know what to say. I am flattered. We are flattered. This is what an author wishes to hear and what fills me with delight. I hope that we will be able to continue to work on our site and that our visitors will be as satisfied as you are :D thx
Ben beastieboyben AT gmail DOT com said on 2006-05-13 18:55:31
Thanks this is great. it would work very nicely in a game as a background.
. said on 2006-08-10 20:14:23
i guess i'm the first to insult it... it's awesome and all, but there's just one thing: for those people that look too much into pictures (like me), it seems like the light is coming from right in between the windows, on the floor of room up there. Other than that, it's perfect! (sorry if that sounded mean, i really like it :P)
Martin mato AT t-tutorials DOT com said on 2006-08-11 17:58:42
Thx for comment, little dot, though I would prefer if you wrote your email. I could let you know that it wan not an insult what you said. I believe that it is only [constructive] criticism that moves fhings forward. And to the Light in the Tower itself, well, as its author .... I think you are right. We (me and couple of my friends have already discussed it and we agreed that it must be a ghost standing in the front corner, so that the light can emanate in those directions as it does) In my opinion, I should have sticked more to the perspective as to make it look more persuasive. Ahhh ;D
Ali gurlaash AT hotmail DOT com said on 2006-08-24 21:17:11
This actually is a f***** up tutorial..I dont know something must be missing a step or two may be.. right after the Gradient while applying the Radial Blur...Man its totally f***** up I dont know what these ppl are falttering you for... May be you could have a re-look on this or something.. I have tried each step four times and this blur effect with Zoom doesnt come out the way in your pictures..
Ali gurlaash AT hotmail DOT com said on 2006-08-24 21:21:44
oh or may be this tutorial is not for PS 7
Martin mato AT t-tutorials DOT com said on 2006-08-25 08:49:28
Hey man, first of all, if you wan to write something, use non 4 letter words such as your F something. Secondly, 13435 users have seen the tutorial and you are the first one to complain so it might be worth considerin that it was you to skip a step or two. I sugest you described the problem you are encountering and I wil try to help you, and/or update the tuorial.
Ali gurlaash AT hotmail DOT com said on 2006-08-30 01:47:19
Well i feel I shouldnt have used the F words anyway I didnt mean to bring any insult to you...and regarding that tutorial again.. I havent been able to acheive that look yet which brings me to the conclusion that this must be done with PsCS or something.. I have been trying this with Ps 7 but that Radial Blur (off course with the Zoom thing on) does not bring anything closer this effect....may be you should also mention the version of the Ps with the tutorials ..sometimes it really helps..
Martin mato AT t-tutorials DOT com said on 2006-08-31 20:06:00
You might be right, well, I will do the tutorial again myself and check. I will let you know. I am well intrigued myself. And for the F words, we do not like to have these on the website since we regard them as rather unconfortable for other users including us. But I understand that you were quite upset to find out that the tutorial you have been making your way through has led you to something that can not be done. As I said, I will check and let you know. And btw, I have made that tutorial in Photoshop 7. But I will check anyway. I hope it will help you and as well us to improve our tutorials.
Ali gurlaash AT hotmail DOT com said on 2006-08-31 22:03:41
Well thanks for considering it for a re-do.. I have had tried to achiveive that look on so many different pictures.. anyways I an looking forward to hear from you once u give it a re-shot.
Ali gurlaash AT hotmail DOT com said on 2006-09-22 13:15:02
Martin! I thought when you said you ld have a re-check on the tutotial, you really meant it. You know what Martin I dont think no one will ever acheive this effect by simply following this tutorial. By now I have forgotten the number of attempts I have made to do so. Each time I would start from scratch but no way man..as I said before there must be a step or two thats missing.
TheGameMaker tgm_forums AT yahoo DOT com DOT br said on 2007-02-11 15:02:08
Nice tutorial. I liked it.